In this post I’m going to give you a step-by-step description of the extreme lateral interbody fusion (XLIF) procedure from patient positioning to skin closure. While I will occasionally do XLIF as a standalone procedure (when only a spacer is inserted without any posterior instrumentation inserted at the back of the spine) I almost always insert pedicle screws after the XLIF is complete. The information about XLIF is quite detailed and thus the post gets quite long so I’ll explain the pedicle screw portion of the case in a future post. Keep in mind that this is how I do XLIF in my OR for a standard one-level case. While the general steps of the procedure are the same no matter where you get your XLIF, some variation may occur so if your surgeon does it a bit differently that doesn’t mean he’s doing it incorrectly. My hope is that this explanation will be helpful to you if you’re considering the procedure or if you’ve already decided to undergo XLIF and want to know what exactly is going to happen to you while you’re asleep. This is a long, detailed post so hang in there.
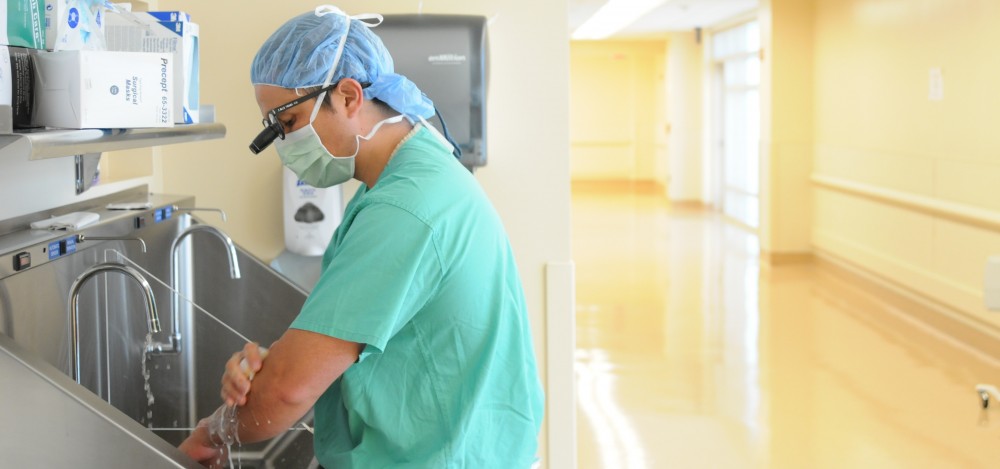
Step 1: Induction of anesthesia and placement of neuromonitoring leads. After you’re brought into the OR you’ll slide off your bed and over to the OR table. The people who typically will be in the room with you will be myself, my physician assistant Jack, an OR nurse, a surgical technician (the person who handles all of the surgical instruments), the anesthesiologist or nurse anesthetist (CRNA), an X-ray technician (to run the fluoroscopy machine called a C-arm) and a representative from the company who manufactures the spacers and screws that I’ll implant in your spine. Once you’re on the OR table you’ll be put to sleep and then intubated (when a breathing tube is inserted into your windpipe so that a machine can breathe for your during surgery.) An extra IV and a Foley catheter (inserted into your bladder to collect urine) may be inserted as well. After all of this is done we will then insert small needle electrodes into the major muscles of your legs (see figure 1.) These electrodes are then connected to a computer system that then monitors the status of the nerve signals to these muscles during surgery. As we’ll discuss in a later post, one of the major complications that may occur during XLIF is an injury to one of the nerves of the lumbar plexus that provides motor and sensory function to your legs. These electrodes allow me to monitor the function of these muscles, and thus the nerves of the lumbar plexus, so that I know I’m not injuring any of them. More on this later. (Some patients occasionally ask me why there are little blood spots on their legs after surgery…the placement of these electrodes is why.)

Figure 1: small needle electrodes are inserted into the major muscle groups of the legs to allow for monitoring of the nerves of the lumbar plexus.
Step 2: Patient positioning and taping. Now that you’re all hooked up to the anesthesia machine and the neuromonitoring system we’ll put you into the position that you’ll be in for the entirety of the case. Several of us will all grab hold of the sheet you’re laying on and then will put you into the lateral decubitus position which basically is how you’d look if you were asleep on your side on a park bench. Unless there’s something unusual about your anatomy I’ll position you RIGHT side up so that your XLIF incision will be on your RIGHT flank (regardless of which side your leg pain is worse on.) XLIF surgeons will debate about which side up is best for the procedure. In my hands I think that right side up is safer (honestly, because that’s what I’m familiar with after hundreds of XLIFs) but a lot of surgeons go left side up because that’s the way that XLIF is classically taught. In my opinion it really doesn’t matter which side is up as long as it’s the side that your surgeon is comfortable with. Even though you’re on a heavily padded OR table we’ll pad critical pressure points (like your armpit and knees) so that you don’t get pressure injuries during surgery. We’ll then flex your knees and hips slightly (to relax the psoas muscle and the nerves of the lumbar plexus within so that they’re easier to navigate during the docking of the retractor. See below.) and then secure you to the table with tape. It’s lot of tape actually (see figure 2.) It’s critical that I maintain a perfectly perpendicular trajectory to the side of spine during the XLIF procedure. If you’re not secured to the table well enough you may slowly roll to one side or the other which may put you at risk when suddenly you’re not in the position that I expect you to be in. The multiple passes of tape across your hips, legs and chest prevent this rolling. Of course we’ll also confirm throughout the case that you’re still positioned correctly by checking an image with the C-arm machine.
 \
\ Figure 2: after positioning the patient with the right side up, we then secure the patient to the OR table with multiple passes of 3-inch tape. Lots of tape.
Step 3: X-ray confirmation and patient marking. Now that you’re positioned on the OR table with your left side down and your right side up I’ll then obtain an image of your spine using the C-arm machine and then plan an incision on your right flank centered over the level of the spine that we’re treating. First we’ll shoot an AP X-ray shot (front to back) with the C-arm to confirm that your spine is not rotated at all. Again I want to be certain that I’m approaching your spine at a 90-degree angle (directly lateral) so we’ll correct any rotation we see on that first X-ray. Once we’ve ensured that you’re not rotated I’ll then bring the C-arm to a lateral view (side view) to localize the correct level where we’re working and then mark the boundaries of the disc space. If we’re working at L4/5 for example (where I do in the vast majority of cases) I’ll mark the endplates of the L4 and L5 vertebral bodies as well as the front and back boundaries of the disc space. I’ll then plan a 3cm incision centered over this marked disc space (see figure 3.) I’ll then box in the area of the incision, as well as an area over your lumbar area where I’ll eventually make small incisions for the screws, with some preliminary sterile sticky dressings called “10-10s” (see figure 4.)

Figure 3: Marking the boundaries of the disc space at L4/5. Note the C-arm monitor in the background.

Figure 4: The boundaries of the disc space between the L4 and L5 vertebral bodies. I’ll typically center my incision right over the disc space.
Step 4: Patient prepping, draping and time out. After you’re positioned and we’ve planned our incisions the OR nurse will then use iodine solutions to “scrub and paint” any areas of skin boxed in by the 10-10s (see figure 5.) During this time I’m scrubbing my own hands and will come in to get my surgical gown and gloves on. After this Jack (my PA) and I will cover you in drapes so that only your flank and lumbar areas are exposed. I’m draping not just for the XLIF but also for the placement of pedicle screws (see figure 6.) At this time we’ll also check to be certain that you have “4 twitches” which indicates how well your muscles respond to stimulus. We don’t want you to have any muscle relaxing agent on board here so that it doesn’t interfere with the accuracy of the neuromonitoring system. After all this is done and prior to making an incision we’ll do the OR time out where the entire team confirms that we’ve got everything in the OR ready to do the case correctly (including confirming the identity of the patient as well as the correct level/side of the procedure.). You can never be too careful.

Figure 5: the OR nurse does a “scrub and paint” prep to remove any skin bacteria or other contaminants.

Figure 6: all set up and waiting for the OR time out.
Step 5: Incision and exposure. After the time out we’re ready to start the case. The flank incision is made first with the scalpel and then carried down through the underlying fat with Bovie cautery. I’ll come down with the Bovie until I arrive at the external layer of fascia enveloping the muscular layers of the abdominal wall (the three layers are: external oblique, internal oblique and transversalis muscles, see figure 7). I carefully incise the external fascial layer and then use the scissors to bluntly dissect (not cut) through the muscular walls until I can pop through the inner layer of fascia and into the retroperitoneal space. This is the space behind the cavity containing your abdominal contents. I’ll confirm that I’m within the retroperitoneum by palpating the surface of the psoas muscle-it has a very distinctive feel as it rolls under my fingertip. Once I’m certain I’m where I’m supposed to be, in the retroperitoneum and on the surface of the psoas, I’ll proceed with traversing the psoas.

Figure 7: right flank incision showing the subcutaneous fat, the external fascia of the muscular abdominal wall and the oblique muscles within.
Step 6: Dilation of psoas muscle and docking of XLIF retractor. Once I can feel the surface of the psoas muscle I’ll take the first of a series of 3 tubular dilators and place it on the surface of the muscle at the level of the spine that I’m targeting (see figure 8.) Remember those monitoring leads we inserted into the leg muscles prior to the case? This is where I’m going to need them. The dilators are electrically stimulated (via a clip at the top) in such a way that they emit a small directional electrical charge. Thus, when I pass the dilator through the psoas en route to the side of the disc space I will rotate the dilator in order to send out a directional electrical charge to each quadrant of the working area to hunt for the nerves of the lumbar plexus. If the tip of the dilator is close to a nerve it will stimulate the nerve at a certain threshold and fire the muscles in the leg innervated by that nerve. My goal is to land on the disc space in front of the nerves of the lumbar plexus so I only want to see stimulation when I’m stimulating towards the back of the patient (see figure 9.) If I see stimulation when I have the tip of the dilator aiming towards the front of the patient then I know I’m not in the right place. I know this is complicated and probably more than you need to know for your XLIF. In my opinion, though, this process of traversing the psoas muscle with the dilators and using them to locate the nerves of the lumbar plexus is the crux of the procedure. If done properly this makes XLIF one of the safest fusion procedures around and reduces your chance of a nerve injury to near zero.
Once I’m happy with where I’ve placed the first dilator I’ll insert a K-wire through the dilator and into the disc space to anchor it in place (see figure 10.) I’ll then use sequentially larger tubular dilators, also stimulated, to gently dilate the psoas muscle. Once the dilation is complete I’ll insert the specialized MaXcess retractor over the dilators and attach it to a special arm that’s attached to the bed. I remove the dilators and then insert light sources to illuminate the working area. Lastly, I’ll use a handheld nerve stimulator to be sure there are no nerves traversing the working area that were somehow missed during the initial dilation. Once I know the area is free of nerves I’ll insert a shim through the back retractor blade and into the disc space. This secures the retractor to the disc space so that it won’t shift during the procedure (and also prevents any nerves of the lumbar plexus from creeping into the working area.) Now the retractor is anchored to the spine, the working area is illuminated and free of any nerves and I’m ready to go (see figure 11.) Of note, the back blade of the retractor (which should have the nerves of the plexus safely behind it) can also be stimulated. Throughout the remainder of the case I’ll periodically stimulate this blade to check the health of the nerves behind it. If it’s taking more and more stimulation to fire the nerve I can assume that the nerve is at risk of injury and I’ll take steps to mitigate these risks (like move more quickly or reposition the retractor.) The point is that I’m constantly thinking about the nerves of the lumbar plexus for the entire time that the retractor is in place within the psoas muscle.


Figure 8: image on left shows insertion of the first of a series of 3 tubular dilators. Note the cable attached to the dilator. The tip of the dilator emits a directional electric charge that allows me to search for the nerves of the lumbar plexus. Image on right shows the tip of the retractor on the side of the spine in front of the nerves of the lumbar plexus. As the tip gets closer to a motor nerve the monitoring system will turn from green to yellow to red to indicate the proximity of the dilator to the nerve.

Figure 9: the nerves of the lumbar plexus shown on the left side of the spine (this patient, unlike the patient in our images, is LEFT side up with the front of the spine at the top of the image and the head of the patient to the right.) The goal is to dock IN FRONT of the motor nerves of the plexus, particularly the femoral nerve (see the small red circle on the L4/5 disc space.) Note that the sensory nerves of the plexus, the genitofemoral nerve, the iliohypogastric nerve and the ilioinguinal nerve run on the surface of the psoas muscle or in the soft tissue of the retroperitoneal space and thus aren’t usually at risk while docking on the side of the disc space. (Source: Uribe et al, 2010)

Figure 10: C-arm image showing the first dilator in place on the center of the L4/5 disc space. At about this “50-yard line” of the disc space I’m usually far enough forward to be in front of the lumbar plexus. It’s tough to see but a K-wire has also been inserted into the disc to hold the dilator in place.


Figure 11: image on left shows C-arm image showing retractor docked over the L4/5 disc space. A shim is inserted into the disc space to anchor the retractor in place and prevent any migration of the nerves of the lumbar plexus into the working area. Image on right is an illustration of what is seen on the C-arm image (courtesy of Nuvasive.)
Step 7: Discectomy and preparation of disc space. Now I can look down the retractor at the side of the disc space. I use surgical loupes to magnify the working area at the base of the retractor (see figure 12.) I know that the area is free of any nerves so I can start to remove the disc without fear of injury to the nerves of the plexus. I cut out the annulus of the disc space and then use a “box-cutter” to traverse the disc space and release the contralateral annulus (see figure 13.) This contralateral release is key to getting maximum height restoration with your spacer later. I’ll then use curettes and other scrapers to clean all of the disc material out of the disc space and off of the vertebral endplates. This is another key step. If the endplates aren’t sufficiently debrided of disc material then new bony growth into the spacer and bone graft won’t occur. Bad disc preparation=no fusion!

Figure 12: XLIF is done through a narrow, minimally-invasive corridor so I have to use surgical loupes to magnify the working area at the base of retractor.

Figure 13: A “box-cutter” is passed from right-to-left (left-to-right on this AP, or front-view, C-arm image) through the disc space to remove the bulk of the disc material and also to release the contralateral annulus of the disc space (notice how the cutter is protruding just a bit outside the left side of the disc space.) This contralateral release is critical for getting adequate height restoration from the inserted spacer.
Step 8: Sizing of disc space and insertion of spacer. Ok so now the disc space is completely cleaned out. I’m ready to insert the properly sized spacer (also known as a cage.) We will first insert a trial to make sure the spacer is going to sit in the proper location within the disc space (see figure 14.) I’ve already done measurements on preoperative images so I usually already know what size spacer I’m going to need but if there’s any question the appearance of the trial within the disc space (on the fluoroscopic image) will help me select the spacer size. Once we’ve decided on the correct spacer height, length, width and lordosis (angulation) we’ll pack it with graft material and get ready to insert it into the prepared disc space. I could spend an entire post talking about various graft materials. Usually I use a product called Osteocel which is basically cadaveric bone fragments prepared in a way such that it contains stem cells to promote bone growth (see figure 15.) I’ll then attach the spacer to an inserter and gently tap it into the disc space with a mallet. I’ll check the final positioning of the spacer with front and side view fluoroscopic images (see figure 16.) If I’m happy with the placement of the spacer I’ll irrigate, look for any bleeding and then collapse and remove the retractor. Generally the entire process, from initial docking of the retractor to the time I collapse and remove the retractor takes 10-15 minutes in my hands (see figure 17.) There is very clear evidence in the literature that suggests that the longer that retractor is place in the psoas the higher the risk of injury to the lumbar plexus. Speed matters in XLIF!

Figure 14: a trial spacer is inserted into the disc space to ensure a) that the spacer will sit in a good position in the disc space, and b) that we’ve selected the spacer with the appropriate height, width, length and lordosis (usually we do this in advance based on the patient’s MRI but we double check here.)

Figure 15: a PEEK spacer loaded with Osteocel and ready for insertion. PEEK isn’t visible on X-ray so small metal markers are embedded in the spacer to allow for visualization (notice the small metal bumps on the surface of the spacer.)

Figure 16: AP C-arm image showing spacer in place, still attached to inserter. Note the metal markers (black lines) that indicate the outer boundaries as well as the center of the spacer.

Figure 17: intraoperative view looking down the retractor at spacer in its final position within the disc space.
Step 9: Drain placement and closure. After I remove the retractor I place a small drain into the psoas muscle where I was working. This is an unusual step that not many surgeons do. One minor complication that can occur after XLIF is numbness, tingling and even burning on the front of the thigh on the side of the access for XLIF. Usually this is minor but in some cases it can be quite bothersome and can persist for several months. This complication usually occurs as a result of stretching of one of the sensory nerves of the lumbar plexus. When we looked at our data for 50 patients who didn’t have a drain placed versus 50 patients who did have a drain placed, we found that the patients with a drain had a 10x reduction in the incidence of postoperative thigh sensory disturbances (from 40% to 4%!) Ever since we discovered this in our data we’ve always used drains in the psoas after XLIF. After the drain is placed (which is removed the next day before the patient goes home) we’ll close the fascia of the muscular abdominal wall and then the dermis (the layer just below the skin) with absorbable sutures. The skin is closed with small adhesive strips (see figure 18.)

Figure 18: we insert a small Blake drain into the psoas muscle where we were working to drain any residual blood and hopefully prevent any postoperative thigh symptoms.
Step 10: Posterior instrumentation and fusion. After the spacers are inserted we’ll place bilateral pedicle screws and perform the posterolateral bony fusion. I think I’ve probably already exhausted you with the very detailed discussion above so I’m going to talk about this second half of the procedure in the next post. It is worth noting that the two things we typically DON’T do at this point (which most other lateral access surgeons still do) are: 1) perform a laminectomy to directly decompress stenosis; and 2) flip the patient prone to place the pedicle screws. First, remember I told you about the power of indirect decompression. Now that you’re a believer in indirect decompression you know that a direct laminectomy is almost never necessary after XLIF. I know from looking at my XLIF data over the past 5 years that (as of the posting of this post) out of 253 XLIF patients since I started keeping detailed records in 2014 only 3 have had to return to the OR for failure of indirect decompression and none have had to go back in the past two years. That’s 1.2%. Why would I subject you to nearly an extra hour of anesthesia time, not to mention the risks of me drilling around your nerve roots (my spinal fluid leak rate is probably 1-2% although I’ve never formally calculated it) when 99% of my patients don’t need direct decompression after XLIF?? Believe in indirect decompression!
Regarding the placement of pedicle screws, the standard method is to finish the XLIF, take the drapes down, flip the patient face down onto another OR table and then re-prep and drape. That takes at least 45 minutes with all hands on deck! Instead, we’ve pioneered a strategy of lateral single-position surgery (LSPS) in which we keep the patient in the lateral position and place the screws that way (see figure 19.) This has led to massive increases in our OR efficiency that I’m certain will translate into better patient outcomes (I’m involved in several studies to prove this in the literature.) It seems obvious to just place screws in the lateral position after XLIF but believe it or not a lot of surgeons still feel like they have to reposition the patient prone to place screws safely. Slowly but surely, through surgeon education and by publishing our data, we’re starting to convince surgeons of the value of LSPS. More on this in future posts.

Figure 19: placing pedicle screw fixation (yes, using a power drill) with the patient in the lateral decubitus position (patient is right side up with head towards the left of the image.) By avoiding having to flip the patient prone and also by allowing members of the surgical team to work concurrently (notice my assistant Jack working in the front of the patient) this strategy of lateral single position surgery saves a tremendous amount of time under anesthesia for the patient. This likely translates into improved patient outcomes.


Figure 20: pre- and post-operative images of a patient who underwent an L4/5 XLIF and percutaneous pedicle screw fixation for a spondylolisthesis. This patient had complete resolution of their preoperative symptoms after surgery and went home after less than 24 hours in the hospital.
Thanks for reading! I know it was a detailed one! I just want you to be educated as possible about XLIF if you’re considering it yourself!
J. Alex Thomas, M.D.
References:
1. Uribe JS, Vale FL, Dakwar E: Electromyographic Monitoring and Its Anatomical Implications in Minimally Invasive Spine Surgery. 35:368–374, 2010.
